A viewfinder serves the same purpose for the artist as a camera lens does for a photographer.
It frames and crops the image in front of you; it reduces distractions from outside the field of view and helps you to more effectively compose your picture.
Making your own viewfinder is simple.
This is what you do:
Drawing Tutorials :
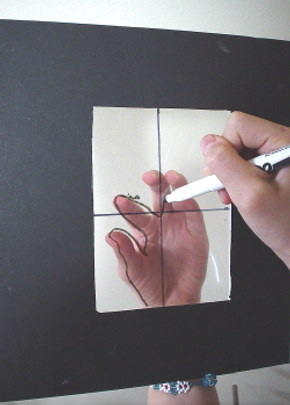
Now Let's Draw on the Picture Plane For this drawing tutorial, you are going to draw your non-dominant hand (i.e. your left hand, if you are right-handed).
Hold your hand with the palm facing you and the fingers pointing toward you. Place the viewfinder on top of your hand where you can see it through the window. Make sure you support the viewfinder with your forearm so you can keep it steady while you are drawing.
Now draw your hand on the picture plane with your erasable marker. On the picture plane, start with any edge of your hand.
“What edge?” you ask.
Spotting the edges on a 3-dimensional object can be tough at first.
Use this trick to help you get started: Close one eye (Doing so will definitely flatten the image, making it 2 dimensional). Trace the line carefully. Next, move to the line adjacent to the first line you've drawn.
Watch out for the urge to name the anatomical parts. Draw exactly what you see, with as many details as you can handle.
Keep the same eye closed and hold your head in the same place. The ensures that you use a consistent point of view for the whole drawing.
When you are done, take a look at your creation. You just have drawn using the time tested viewfinder picture plane method.
Now you are going to transfer your drawing to drawing paper. This might not be as direct and simple as the first part but it is manageable.
Size your drawing paper so that it has the same ratio as that of your viewfinder picture plane.
For instance, if your viewfinder opening has a ratio of 4 to 5, you want to reflect that ratio on your drawing paper, such as 8”x10” or 16x20cm.
Why bother with the ratio? Because you are enlarging or reducing your image with a change in scale—you don't want to distort the shape.
Draw a horizontal and a vertical line that intersect in the middle of your drawing paper. You want to create a simple grid (similar to the cross hairs on your viewfinder) on your drawing paper that will help you with the general placement of the features of your hand.
You are going to copy the drawing from the picture plane to your drawing paper.
You can turn the picture plane upside down and copy it (similar to what was done in the earlier tutorials).
I recommend, however, that you try to copy it right side up.
Either way use the grid lines, and the edges of the picture plane as vertical and horizontal plumb lines to measure the relative slant, angles, and placements of the shapes and lines.
Give yourself 5 to 10 minutes to finish this part of drawing tutorial.
Have you noticed the constant struggle to attach labels to the shapes and parts? Was it more of a struggle than the first drawing tutorials?
That is okay. In the beginning, it is hard to learn a new way of seeing things, but if you keep at it, you will be able to train your brain to take on the artist's mindset.
It frames and crops the image in front of you; it reduces distractions from outside the field of view and helps you to more effectively compose your picture.
Making your own viewfinder is simple.
This is what you do:
- Find a piece of cardboard or a scrap mat board and cut a rectangular window in it. The exact size is not important; a window that is roughly the size of your hand should work just fine.
- Color one side of the board black or some other neutral color of your choice.
- Next, take a sheet of clear overhead projector transparency film and trim it so that it is slightly larger than the window in the viewfinder. Glue the sheet to the back of the viewfinder (the uncolored side) so that it covers the window.
- Use a permanent marker to draw a vertical and a horizontal line through the center of the window (creating “cross hairs” or 2x2 grid).
- Now you have your own viewfinder! Use an erasable marker for drawing on the picture plane (so you can re-use it).
Drawing Tutorials :
Now Let's Draw on the Picture Plane For this drawing tutorial, you are going to draw your non-dominant hand (i.e. your left hand, if you are right-handed).
Hold your hand with the palm facing you and the fingers pointing toward you. Place the viewfinder on top of your hand where you can see it through the window. Make sure you support the viewfinder with your forearm so you can keep it steady while you are drawing.
Now draw your hand on the picture plane with your erasable marker. On the picture plane, start with any edge of your hand.
“What edge?” you ask.
Spotting the edges on a 3-dimensional object can be tough at first.
Use this trick to help you get started: Close one eye (Doing so will definitely flatten the image, making it 2 dimensional). Trace the line carefully. Next, move to the line adjacent to the first line you've drawn.
Watch out for the urge to name the anatomical parts. Draw exactly what you see, with as many details as you can handle.
Keep the same eye closed and hold your head in the same place. The ensures that you use a consistent point of view for the whole drawing.
When you are done, take a look at your creation. You just have drawn using the time tested viewfinder picture plane method.
Now you are going to transfer your drawing to drawing paper. This might not be as direct and simple as the first part but it is manageable.
Size your drawing paper so that it has the same ratio as that of your viewfinder picture plane.
For instance, if your viewfinder opening has a ratio of 4 to 5, you want to reflect that ratio on your drawing paper, such as 8”x10” or 16x20cm.
Why bother with the ratio? Because you are enlarging or reducing your image with a change in scale—you don't want to distort the shape.
Draw a horizontal and a vertical line that intersect in the middle of your drawing paper. You want to create a simple grid (similar to the cross hairs on your viewfinder) on your drawing paper that will help you with the general placement of the features of your hand.
You are going to copy the drawing from the picture plane to your drawing paper.
You can turn the picture plane upside down and copy it (similar to what was done in the earlier tutorials).
I recommend, however, that you try to copy it right side up.
Either way use the grid lines, and the edges of the picture plane as vertical and horizontal plumb lines to measure the relative slant, angles, and placements of the shapes and lines.
Give yourself 5 to 10 minutes to finish this part of drawing tutorial.
Have you noticed the constant struggle to attach labels to the shapes and parts? Was it more of a struggle than the first drawing tutorials?
That is okay. In the beginning, it is hard to learn a new way of seeing things, but if you keep at it, you will be able to train your brain to take on the artist's mindset.
Or
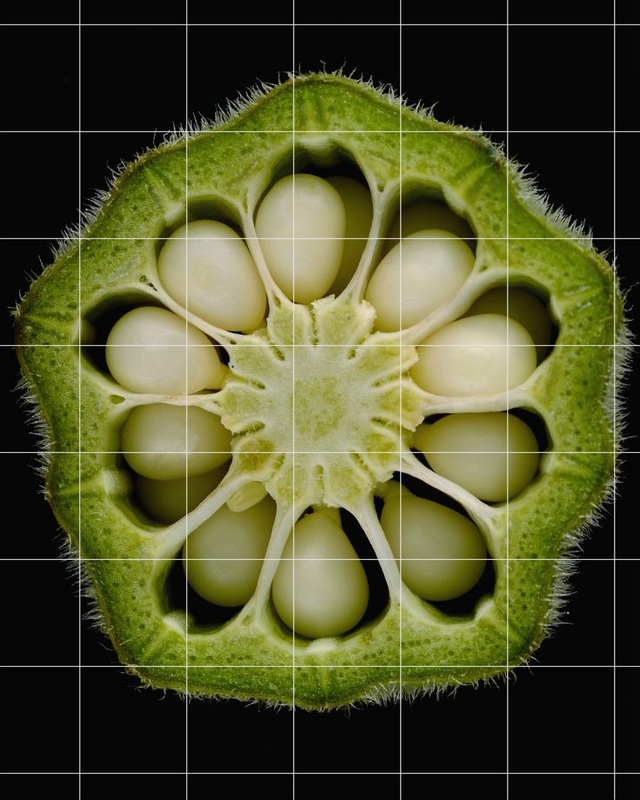
use a grid on a photo
Create your own grid on a picture
Sometimes providing a grid over a 2d image is a great tool to ensure that you are drawing accurately.
Sometimes providing a grid over a 2d image is a great tool to ensure that you are drawing accurately.
Tutorial:
On a piece of paper, create a grid that corresponds to the the image you would like to draw. (For instance this is a 5 1/2 x 7 grid) So you would draw a 5.5 x 7 grid on your paper.
Next start by examining the image box you would like to start in and lightly block in the lines/shapes into the corresponding box on your apper.
Continue in this way until you have an accurate drawing.